GoCardlessDeveloper Docs
Create a sandbox account

PayTo Agreements and Payments#

View as Markdown

PayTo is a real-time payment scheme for Australian bank accounts. GoCardless supports two use cases: setting up an open mandate with your customer, and taking one-off real-time payments.

Step 1: Create a Billing Request#

Use the mandate_request field when creating a Billing Request to set up a PayTo mandate. The following requirements must be met:

  • scheme must be pay_to
  • purpose_code is required
  • description is required
  • constraints is optional

Purpose code#

The purpose_code attribute specifies the high-level purpose of the mandate. Accepted values are: mortgage, utility, loan, dependant_support, gambling, retail, salary, personal, government, pension, tax, and other.

See the full list of supported values in Billing Request Purpose Codes.

Constraints#

Constraints specify the limits on recurring payments, allowing you to collect payments without requiring the payer to re-consent each time — provided payments fall within the agreed constraints.

ParameterDescription
start_dateDate from which the consent is valid. Must not be in the past; the payer must have enough time to complete the flow before this date.
end_dateDate after which payments cannot be collected. Must not be in the past or before start_date.
max_amount_per_paymentMaximum amount that can be charged per payment.
periodic_limits[].periodRepeating time frame: year, month, week, or day.
periodic_limits[].max_paymentsMaximum number of payments that can be taken within the period.

Example request#

POST https://api.gocardless.com/billing_requests HTTP/1.1
{
  "billing_requests": {
    "purpose_code": "mortgage",
    "mandate_request": {
      "currency": "AUD",
      "scheme": "pay_to",
      "constraints": {
        "start_date": "2030-06-27",
        "end_date": "2020-12-30",
        "max_amount_per_payment": 100,
        "periodic_limits": [{ "period": "month", "max_payments": 2 }]
      }
    }
  }
}

You'll receive a full Billing Request object in response:

{
  "billing_requests": {
    "id": "BR123",
    "status": "pending",
    "mandate_request": {
      "currency": "AUD",
      "scheme": "pay_to",
      "constraints": {
        "start_date": "2030-06-27",
        "end_date": "2020-12-30",
        "max_amount_per_payment": 100,
        "periodic_limits": [
          {
            "period": "month",
            "max_payments": 2
          }
        ]
      }
    },
    "payment_request": null,
    "metadata": null,
    "links": {
      "customer": "CU123",
      "customer_billing_detail": "CBD123",
      "creditor": "CR123",
      "organisation": "OR123",
      "mandate_request": "MRQ123"
    },
    "purpose_code": "mortgage",
    "creditor_name": "Hotel Park Grand",
    "actions": [
      { "type": "collect_customer_details", "required": true, "status": "pending" },
      { "type": "collect_bank_account", "required": true, "status": "pending" },
      { "type": "bank_authorisation", "required": true, "status": "pending" }
    ]
  }
}

Step 2: Create a Billing Request Flow#

Create a Billing Request Flow to generate a hosted checkout link for your customer. For PayTo, always include an exit_uri.

POST https://api.gocardless.com/billing_request_flows HTTP/1.1
{
  "billing_request_flows": {
    "redirect_uri": "https://my-company.com/landing",
    "exit_uri": "https://my-company.com/exit",
    "links": {
      "billing_request": "BRQ000010NMDMH2"
    }
  }
}
$client = new \GoCardlessPro\Client(array(
  'access_token' => 'your_access_token_here',
  'environment'  => \GoCardlessPro\Environment::SANDBOX
));
 
$client->billingRequestFlows()->create([
  "params" => [
    "redirect_uri" => "https://my-company.com/landing",
    "exit_uri" => "https://my-company.com/exit",
    "links" => [
      "billing_request" => "BRQ000010NMDMH2"
    ]
  ]
]);
import gocardless_pro
client = gocardless_pro.Client(access_token="your_access_token_here", environment='sandbox')
 
client.billing_request_flows.create(params={
  "redirect_uri": "https://my-company.com/landing",
  "exit_uri": "https://my-company.com/exit",
  "links": {
    "billing_request": "BRQ000010NMDMH2"
  }
})
@client = GoCardlessPro::Client.new(
  access_token: "your_access_token",
  environment: :sandbox
)
 
@client.billing_request_flows.create(
  params: {
    redirect_uri: "https://my-company.com/landing",
    exit_uri: "https://my-company.com/exit",
    links: {
      billing_request: "BRQ000010NMDMH2",
    }
  }
)
import static com.gocardless.GoCardlessClient.Environment.SANDBOX;
String accessToken = "your_access_token_here";
GoCardlessClient client = GoCardlessClient
    .newBuilder(accessToken)
    .withEnvironment(SANDBOX)
    .build();
 
BillingRequestFlow billingRequestFlow = client.billingRequestFlows().create()
  .withRedirectUri("https://my-company.com/landing")
  .withExitUri("https://my-company.com/exit")
  .withLinksBillingRequest("BRQ000010NMDMH2")
  .execute();
const constants = require("gocardless-nodejs/constants");
const gocardless = require("gocardless-nodejs");
const client = gocardless("your_access_token_here", constants.Environments.Sandbox);
 
const billingRequestFlow = await client.billingRequestFlows.create({
  redirect_uri: "https://my-company.com/landing",
  exit_uri: "https://my-company.com/exit",
  links: {
    billing_request: "BRQ000010NMDMH2",
  },
});
String accessToken = "your_access_token";
GoCardlessClient gocardless = GoCardlessClient.Create(accessToken, Environment.SANDBOX);
 
var resp = await gocardless.BillingRequestFlows.CreateAsync(
  new GoCardless.Services.BillingRequestFlowCreateRequest()
  {
    RedirectUri = "https://my-company.com/landing",
    ExitUri = "https://my-company.com/exit",
    Links = new GoCardless.Services.BillingRequestFlowCreateRequest.BillingRequestFlowLinks {
      BillingRequest = "BRQ000010NMDMH2",
    },
  }
);
 
GoCardless.Resources.BillingRequestFlow billingRequestFlow = resp.BillingRequestFlow;
package main
 
import (
	gocardless "github.com/gocardless/gocardless-pro-go/v6"
)
 
accessToken := "your_access_token_here";
opts := gocardless.WithEndpoint(gocardless.SandboxEndpoint)
client, err := gocardless.New(accessToken, opts)
 
billingRequestFlowCreateParams := gocardless.BillingRequestFlowCreateParams{}
billingRequestFlowCreateParams.RedirectUri = "https://my-company.com/landing"
billingRequestFlowCreateParams.ExitUri = "https://my-company.com/exit"
billingRequestFlowCreateParams.Links.BillingRequest = "BRQ000010NMDMH2"
billingRequestFlow, err := client.BillingRequestFlows.Create(context, billingRequestFlowCreateParams)
{
  "billing_request_flows": {
    "authorisation_url": "https://pay.gocardless.com/billing/static/flow?id=<brf_id>",
    "lock_customer_details": false,
    "lock_bank_account": false,
    "auto_fulfil": true,
    "created_at": "2021-03-30T16:23:10.679Z",
    "expires_at": "2021-04-06T16:23:10.679Z",
    "redirect_uri": "https://my-company.com/completed",
    "links": {
      "billing_request": "BRQ123"
    }
  }
}

Send the authorisation_url from the response to your customer via a button, email, SMS, or any other channel.

Existing customers and locking#

Skip steps for existing customers — If you already have a customer on record, pass their ID in links.customer on the Billing Request to skip the customer details step. Similarly, pass links.customer_bank_account to skip the bank account step. The customer can still edit these details unless they are locked.

Lock details — Set lock_customer_details or lock_bank_account to true on the Billing Request Flow to prevent the customer from changing those details. When both are locked, the customer skips directly to the confirmation step.

Lock scheme and currency — For mandate-only requests, you can set lock_currency to true on the Billing Request Flow. This prevents the customer from changing the scheme or currency, ensuring the mandate is always set up in PayTo.

What the customer will see#

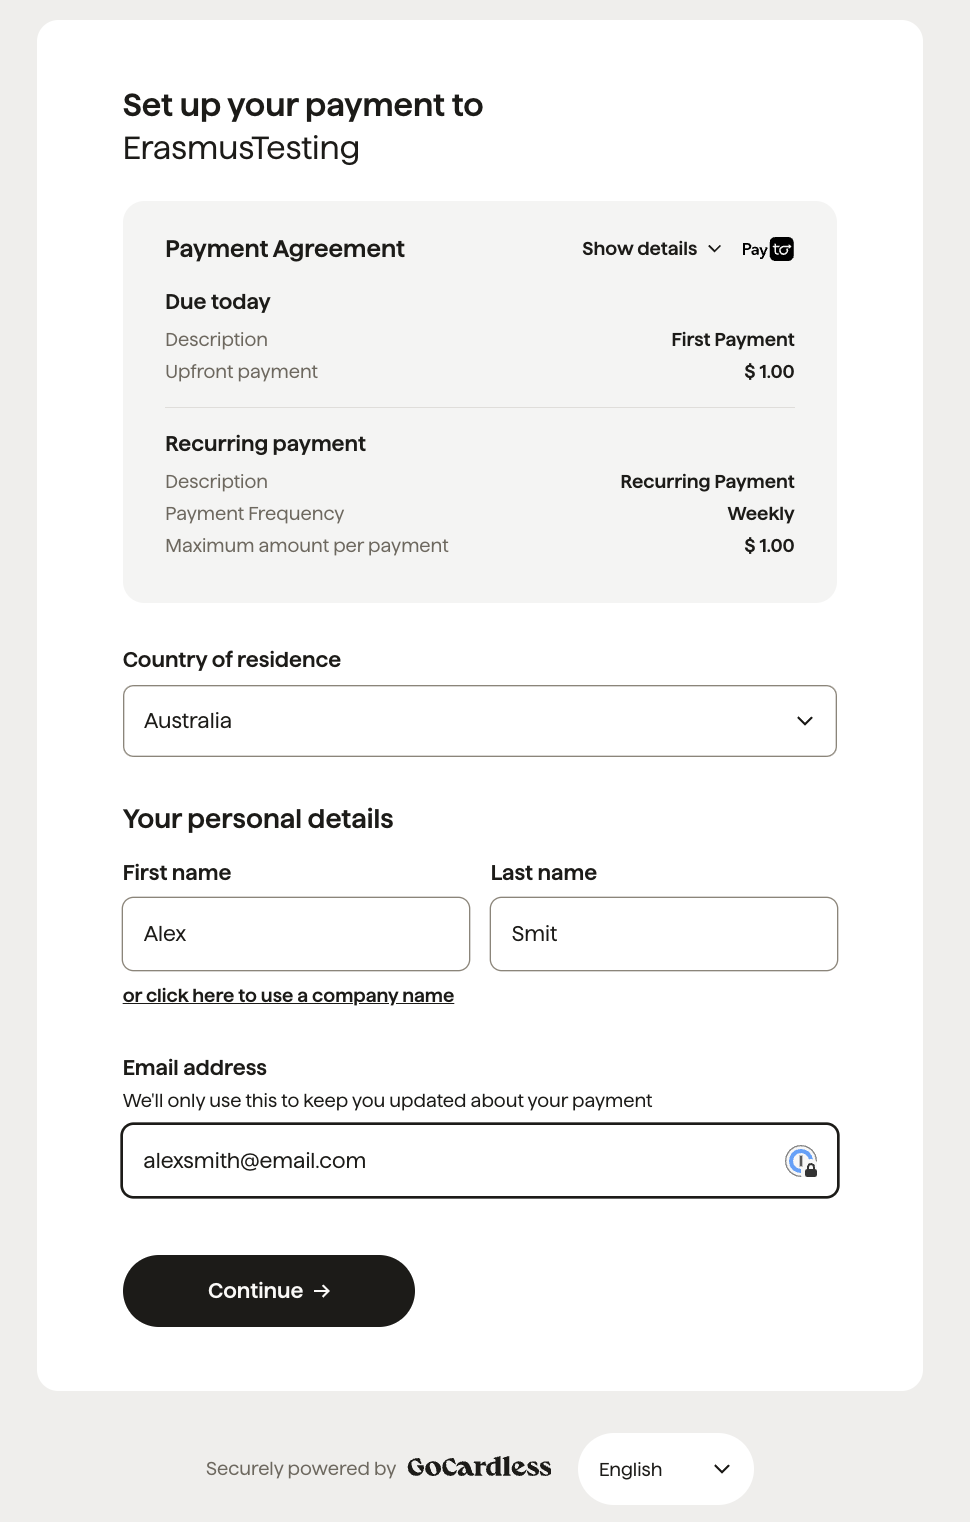
Collect customer details

The customer provides their personal details. This step is skipped if customer details already exist or have been locked.

Collect customer details screen

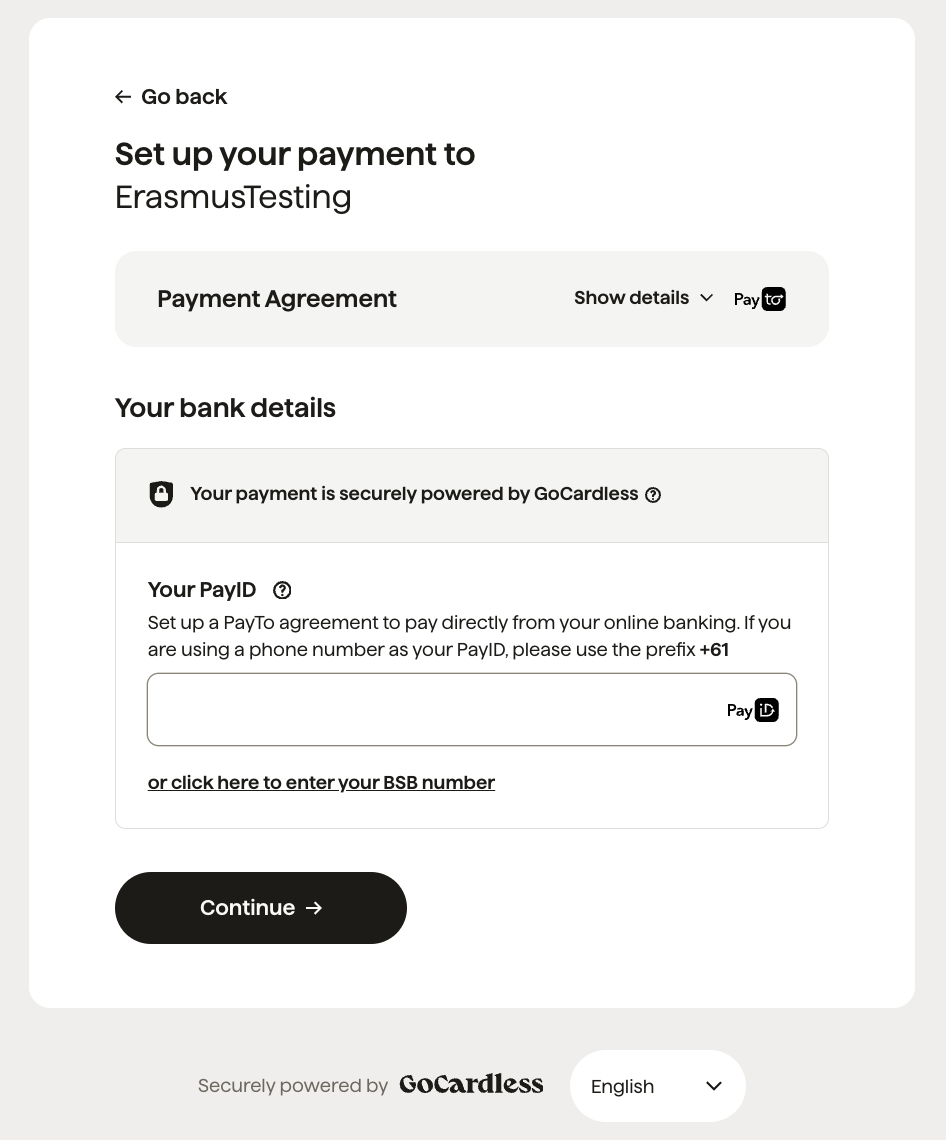
Collect bank details

The customer provides their PayID or bank details. This step is skipped if bank details already exist or have been locked.

Collect bank details screen

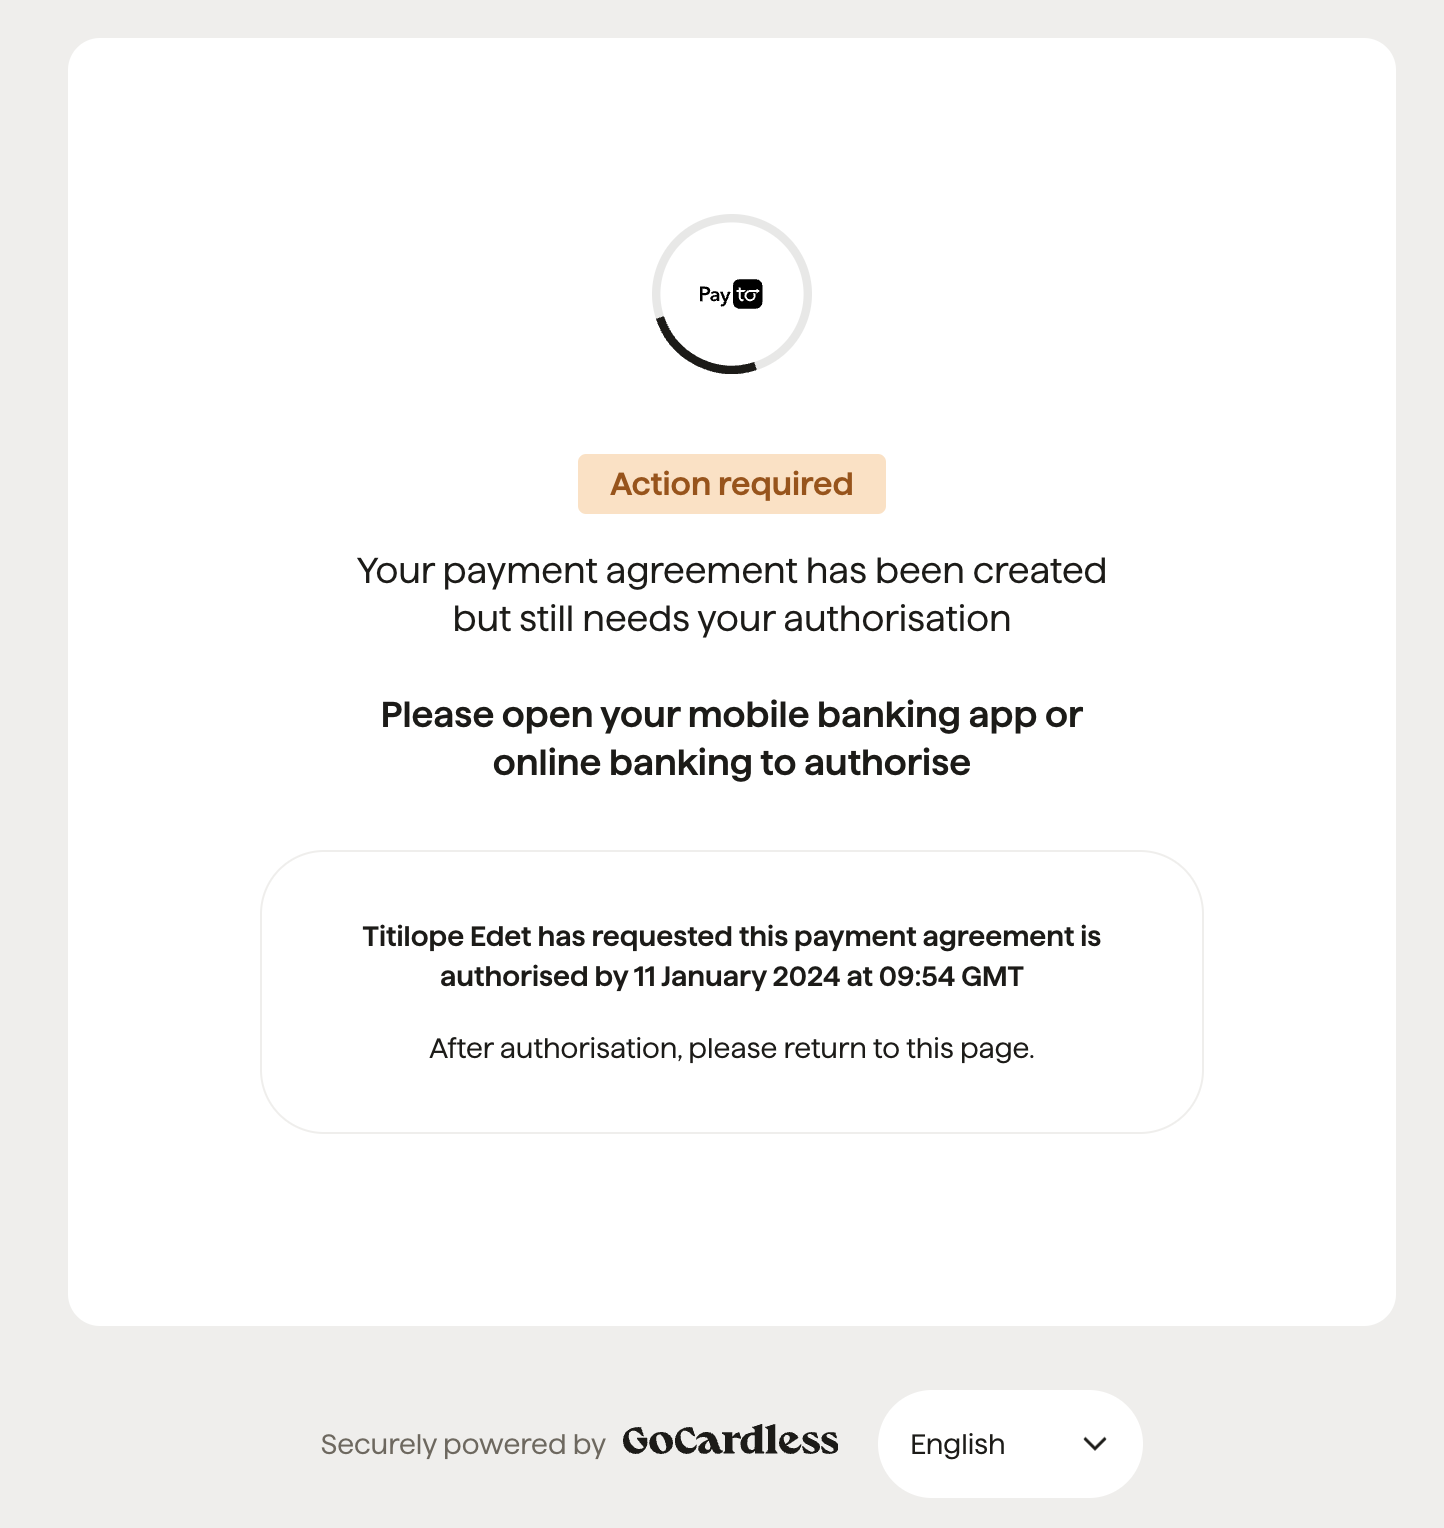
Bank authorisation

The customer is prompted to complete the authorisation in their banking app. Depending on their bank, they may also receive a push notification or SMS.

Bank authorisation screen

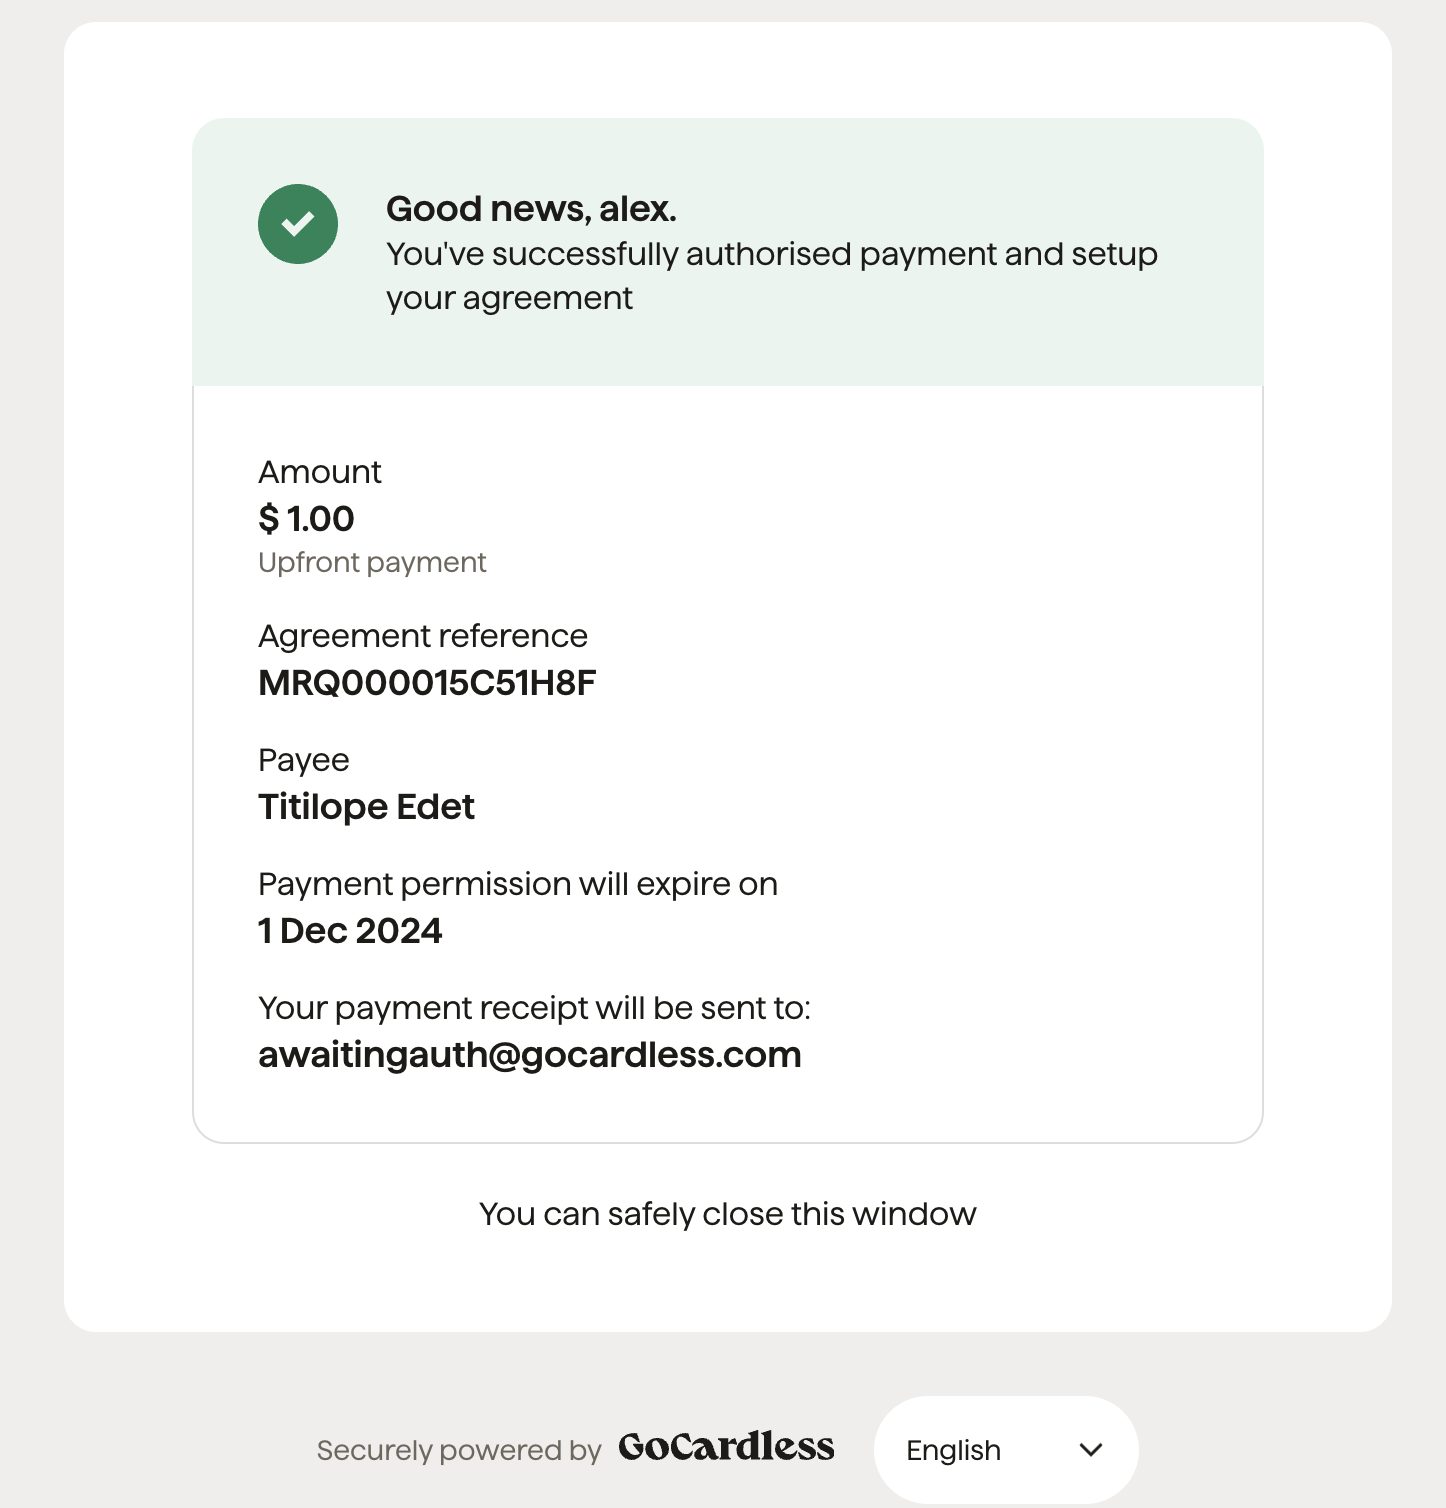
Confirmation

Once authorisation is complete, a confirmation screen is shown. All required actions are fulfilled and the Billing Request is complete.

Confirmation screen

What's next?#